
Amelia Teicheira

Title. Double click me.


I used the spot healing band aid to remove the blemishes from his face. It is located uder the band aid icon.
For this first restoration I used the red eye tool. It is located under the spot eye healing tool. If you click on the red eye tool it will bring up a eye curser and you right click on the eye to change it from red to black.
Restorations
Here are my restorations I fixed on photoshop.
I used the spot healing and band aid tool on his skin to remove all the white lines and damages to the photo.
Restoration 5


Restoration 8
For this restoration I change the hue and saturation and made it look grey. I then used the spot healing tool and fixed the blemishes on the photo. Next I recropped the photo so it didn't have white edges. I also used the clone stamp to fix the white edge that I couldn't crop out.


For this restoration I used the clon tool, spot healing tool, burn tool and the sharpen tool. I also changed the hue and saturation so the photo looked more black and white.
Restoration 9
For this restoration i used the clone tool and the spot healing tool. I then cropped the edges and changed the brightness an contrast.


Restoration 1
Restoration 2
Restoration 3
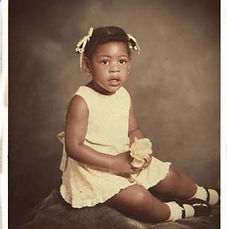
Restoration 6

For this assignment i recropped the photo to fix the water damage and then used the spot healing brush to fix the water damage on her skin. Next I fixed the background. Finally i changed the contrast to make sure her dress was yellow.


For this restoration I used the path tool and fixed the background and the spot healing brush to fix the little girl. Next I changed the contrast and brightness of the photo.
Restoration 7
For this restoration I used the patch tool. You highlight what damages are on the photo and drag it. The tool will blend it for you. Then for the damages on the skin I used the spot healing tool. Finally I changed the sharpness of the photo. I went to filter and unsharpened. next I changed the contrast so the little girl wasn't green.
Restoration 4
Restoration 10


For this restoration I used the spot healing tool on her face. I then used the magic wand to select her teeth. Next I made them white and did a color overlay so they looked normal again. Finally I changed the brightness and contrast of the picture.
Restoration 11


For this restoration I used the spot healing tool to remove the lines on the picture. I then used the clon tool to fix the girl in the centers eyes. Next I changed the contrast and brightness to make the picture look more defined and brighter.
Restoration 12


For this restoration I used the patch tool around her hair. Next I used the clone tool every were else. But first I changed the levels and made the picture look darker and less pixelated. Finally I cloned her eye to fix the white spot next to it. Next I used the spot healing tool on the background to make it look even not pixelated.


Restoration 13
For this restoration I used the clone tool and the spot healing tool. Then I changed the brightness and contrast. To make his shirt a different color I used the history and made it look yellow and the used the paint brush tool to paint his shirt and pants. It made it more defined looking. I also changed the levels. It made it look more defined.
For this restoration I used the clone tool on his mouth. I then used the spot healing tool to fix the life jacket. Finally I changed the levels and then the contrast.


Restoration 14
Restoration 15


For this restoration I copied the edges of the picture and moved them around the recreate the boarder again. I continued to duplicate layer until my boarder was done. I then used the clone tool on the background and made it black again. Next I used the spot healing tool to fix the kids. Finally I change the contrast.
For this restoration I used the spot healing tool and the clone tool. I also used the polygonal tool to recreate the boarder. Next I change the levels and brightness. Finally I change the hue and saturation.


Restoration 16

Restoration 17
Restoration 18


For this restoration I used the clone tool and the spot healing brush. I also changed the levels on the picture and the brightness. Next I used the burn tool so I didn't look so photo shopped.
For this restoration I used the spot healing tool and mainly the clone tool to recreate the background. I then changed the levels of the picture so it was sharper. Next I used the burn tool so the picture blended better.

Restoration 19
For this restoration I fixed the floor. I cropped the guys hair and put it on her head so her hair didn't look blurry. Next I fixed the guy in the background and added another window so it didn't look bare. Finally I changed the levels and used the spot healing tool on parts of the picture.


Restoration 20
For this restoration I used the clone tool. On some spot I had to use the spot healing tool to blend it in. Finally I changed the levels of the photo.